I needed something for my knitting - a bit girly and definitely noticeable. I love felted bags for this time of year. I decided a straightforward rectangular shape would work best, with minimal counting and shaping. The "plain jane" design gets its oomph from the rich purple and bright green wool and the simple flower accent. Here's the result, a free pattern for the "knitter in all" of us:Knitternall Felted Tote
purple and proud of it!

MATERIALS Patons Classic Merino worsted weight wool
3 skeins in 210 Royal Purple
1 skein in 240 Leaf Green
1 skein in any shade pink you choose (I used a remnant of a Cascade 220 marled pink/salmon for the flower)
2 round plastic purse handles, 6" diameter
Size 10 ½ straight and circular needles Gauge: not essential to finished design Finished Dimensions: approximately 12 1/2" x 4" at base, 10 x 12 1/2" for body of bag, 6" diameter handles.
BASE
Note: yarn is held double for the base to increase stability. I used a single strand for the sides, but for added strength and an even larger tote you can continue doubling throughout. You'll need at least 2 more skeins of yarn if you double throughout.
On straight needles and holding two strands of purple together, cast on 60 stitches using long-tail method.
Knit 20 rows in garter stitch. (Note: some other knitters' completed projects have felted much narrower than my prototype. You may have to knit more rows to maximize the width of the base. You'll also have more stitches to pick up along the sides in the next step.)SIDES
With circular needles, pick up and knit 10 stitches along short side of base, 60 stitches along opposite long side of base, 10 stitches along other short side of base: 140 stitches in all.
Knit in the round until sides are approximately 18-20" from base.
Change to Leaf Green and bind off top of bag with I-Cord.
Finish base of bag by adding I-cord trim in Leaf Green.
(For instructions working with I-cord trims, there are many web-based tutorials, including one at http://www.thedietdiary.com/blog/index.php?p=203)
HANDLES
Holding a strand of Purple and a strand of Green together, single crochet yarn around each handle. This method creates a “seam” along the inside of the circles for added stability and dimension.
With straight needles, cast on six stitches in purple. Knit a flat piece in garter stitch approximately 12 inches in length. You will felt this piece, then cut it to attach the handles.
FLOWER
With pink wool and using straight needles, cast on 20 stitches.
Row 1: Purl
Row 2: Knit 1, K2tog, knit across to next to last stitch, K2tog, K1.
Row 3: Purl
Row 4: K1, K2tog, knit across to next to last stitch, K2tog, K1.
Continue this pattern until there are about 14 stitches on needles.
Bind off, leaving a 9” tail.
"Roll" strip into a coil, creating a rose shape. Thread tail into a tapestry needle and secure flower.
LEAF (make 2)
With green wool, cast on 4 stitches
Rows 1 – 3, knit across all stitches. 4 stitches
Row 4, K1, Kf&b, K2 = 5 stitches
Row 5, K1, kf&b, k1, kf&b, k1 = 7 stitches
Row 6, knit across = 7 stitches
Row 7, K1, Kf&b, K3, Kf&b, K1 = 9 stitches
Rows 8-16, knit across = 9 stitches
Row 17, K2tog, K6, K2tog = 7 stitches
Row 18, K2tog, K4, K2tog = 6 stitches
Row 19, K2tog, K3, K2tog = 5 stitches
Row 20, K2tog, K2 = 4 stitches
Rows 21, K2tog, K2 = 3 stitches
Row 22, K2tog, K1 = 1 stitch
Row 23, K2tog, pull yarn through loop to bind off.
Weave in ends.
FELTING
Place all pieces into a zipped lingerie bag or pillow case. Felt in a top-loading washer at hottest water temperature. Check every ten minutes of wash cycle to assess felting. Wh
en you’re satisfied with the results, let wash continue through rinse and spin cycles.
Stretch and shape bag, rose, leaves, and handles, then air dry. Place main part of handbag upside down over a form. (I used two large cereal boxes wrapped in a plastic trash bag.)
Lay leaves and purple pieces flat to dry.
FINISHING
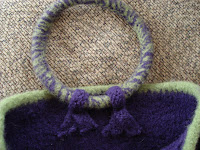
Cut purple strip into four equal sections of approximately 3” each. Wrap two around each handle and sew to main bag on the inside, just below the green icord trim (see photo).
Sew flower pieces onto main bag with purple or black thread held double. Be sure they are attached at multiple points for stability.
I like a very stable base in felted bags. For this one, I purchased a 12" x 3 1/2" piece of thin, unfinished wood (similar to balsa) at my


local crafts store. I sanded it, painted it a crisp gold, and let it dry. It inserts
neatly into the base of the tote, adding dimension and support.
Alternately, you can line your tote with a contrasting fabric.
Comments welcome! If you have any questions about the pattern or suggestions for writing the directions more clearly, please let me know. Thanks!

 that method didn't translate well during the felting process. So I snipped them apart, then used a tapestry needle and extra Rhythm to tie the individual stars together. The result is really cool.


